Tutorial: Uploading a file
In this tutorial you'll follow the steps that your application goes through to send a file with MASV. To do this, you'll use the MASV Agent.
MASV Agent abstracts a lot of the MASV API for you. It is a fast, reliable, flexible way to add file transfers to your application. You can run MASV Agent as a standalone executable or in a Docker container. Because your application interacts with MASV Agent via a RESTful web API, you can run MASV Agent locally, on-premises in your own data center, or in the cloud.
To keep this tutorial simple, you'll run MASV Agent in a Docker container locally on your computer to upload a single file to a MASV Team. After it's uploaded, other members of the Team can download it with the MASV Web App or MASV Desktop App. Of course, you could use the MASV Agent to download packages, too.
What you'll learn
This tutorial shows how your application can do some basic tasks to work with MASV. When you're done, you'll know how to:
- Authenticate your application
- Start an upload
- Monitor the upload's progress
- Finalize the upload
Before you begin
To follow this tutorial, you'll need these things:
- A MASV account with the Owner or Admin role: You can sign up here.
- Access to a command line shell: This tutorial uses GNU Bash running on Linux.
curl: A command line tool to interact with the MASV Agent's HTTP API.jq: A command line tool to make MASV Agent's JSON output more readable.- Docker: Docker Desktop or just the Docker CLI and Docker Compose.
- A file to send: To save time, make sure this file is local and less than 1 MB. Of course, you can send huge files with MASV, up to 15 TB each with unlimited package sizes, but that's not required for this tutorial.
Step 1: Set up MASV Agent
Let's set up a folder to run the MASV Agent. It stores information in a couple of Docker volumes:
config: MASV Agent configurationdata: Uploaded and downloaded files
To keep these volumes persistent, you'll create a couple of local folders for them. It's a good idea to create these local folders before you run the Docker container. If these folders don't exist, Docker creates them with root as the owner.
mkdir -p send-tutorial/config send-tutorial/data && cd send-tutorial
In your favourite text editor, create the compose.yaml file below for the MASV Agent's container. Save the file in the send-tutorial folder. Remember to replace YOUR-PATH with the full path to the local send-tutorial folder you just created.
version: "3"
services:
  transferagent:
    image: masvio/masv-agent:latest
    container_name: masv-agent
    environment:
      - TZ=UTC
      - API_KEY=${API_KEY}
    volumes:
      - YOUR-PATH/send-tutorial/config/:/config
      - YOUR-PATH/send-tutorial/data/:/data
    ports:
      - 8080:8080
    restart: unless-stopped
    command: ["-api-key", "$API_KEY"]
Notice that compose.yaml uses a Docker environment variable, API_KEY. This tutorial uses the API_KEY environment variable to authenticate your requests to the MASV Agent. This way, your application only needs to update a single file to provide the API key to the MASV Agent container. You'll create the API key in the next step.
Tip
Your application can also use Docker secrets to pass the API key to the MASV Agent container.
Step 2: Get an API key
To authenticate its requests with the MASV Agent, your application needs an API key.
To create an API key, you must be the MASV account Owner or Admin for a Team.
Note
Keep the API key secure. It acts like a password that MASV uses to authenticate your requests. Any application that uses this key has the full privileges of your MASV user account.
For this tutorial, you'll store the API key in a file named .env. Docker Compose uses this file to pass environment variables to the container running MASV Agent.
To get an API key:
- Sign in to the MASV Web App as the account Owner or Admin.
- Follow the steps here to create a key: How to create and manage API keys.
- Create a text file named
.envin thesend-tutorialfolder. Remember to use the value of your new API key.
API_KEY='...'
Step 3: Start MASV Agent
Now you're ready to start the MASV Agent container.
Open a new terminal window to start the container. This way you can see the MASV Agent log as you interact with it in the first terminal.
docker compose up
Tip
If you don't have permission to run docker, you might need to add your user to the docker group.
After Docker loads the image and the MASV Agent starts up, you'll see output like this:
masv-agent  | [INFO] 20:47:22: Backend: https://api.massive.app
masv-agent  | [INFO] 20:47:22: Backend Hash: 253df60905e8f2f994078ec212b88d2471b54
masv-agent  | [INFO] 20:47:22: Backend Build Number: 1.12.170
masv-agent  | [INFO] 20:47:22: Backend Build Time: 2024-01-22T15:24:40+00:00
masv-agent  | [INFO] 20:47:22: API Server listening on [::]:8080
Now return to the first terminal window to confirm that MASV Agent has successfully started a new session.
curl --head --request GET http://localhost:8080/api/v1/login
MASV Agent responds with something like this:
HTTP/1.1 200 OK
Content-Type: application/json
Date: Fri, 16 Feb 2024 13:30:53 GMT
Detour: Failed authentication
You might have received something like this:
$ curl --head --request GET http://localhost:8080/api/v1/login
HTTP/1.1 401 Unauthorized
Content-Type: application/json
Date: Fri, 16 Feb 2024 13:35:53 GMT
.env file, and do this step again.
Step 4: Get your Team ID
You'll need a Team ID to specify to which MASV Team you want to upload. The teams endpoint responds with a JSON array of Team objects.
curl --silent --request GET http://localhost:8080/api/v1/teams | jq '.[] | { name, id }'
{
  "name": "First Unit Team",
  "id": "0EGXTA6M1PNLGEV2DJ53FJKGBD"
}
{
  "name": "Second Unit Team",
  "id": "E1XNAZMFP8LDEJ1HKTW5EBAVNM"
}
Decide which Team you'd like to upload to, then define a shell variable for its corresponding id value. Using the example response, to upload a file to Second Unit Team you would use E1XNAZMFP8LDEJ1HKTW5EBAVNM. Remember to use the id value from the JSON response that you received.
TEAM_ID='...'
Detour: Packages
A MASV package is like a virtual folder inside MASV. From the end user's point of view, a package contains all the files and folders of a single transfer. End users work with packages in the MASV Web App and MASV Desktop App. Of course, your application can also use MASV Agent or the MASV API to download packages.
Step 5: Start the upload
You're almost ready to upload a package. For this tutorial, you'll send a single file.
The Docker volume for the /data folder contains the files that MASV Agent uploads and downloads. For this tutorial, you will upload a single file, cat.jpg, to the package. Let's capture that in a shell variable.
FILE=cat.jpg
Now make sure that MASV Agent can access your file. Remember to replace YOUR-PATH with the path to your local file.
cp YOUR-PATH/"$FILE" send-tutorial/data
Now you can upload a package. Your application must provide this information to start uploading a package to a Team:
- Team ID: You already captured this earlier in
TEAM_ID. - Local files and folders to upload: MASV Agent puts these into one MASV package. These must be absolute paths starting with the container's
/datafolder. - Package name and description: Textual name and description for the package that make it easy for users to identify the package.
curl --silent --request POST \
  -H "Content-Type: application/json" \
  http://localhost:8080/api/v1/uploads -d "{ \
  \"team_id\":\"$TEAM_ID\", \
  \"paths\":[\"/data/$FILE\"], \
  \"package_name\": \"My first package\", \
  \"package_description\": \"A cat in a package\" \
}" | jq
MASV Agent starts uploading immediately in the background. It also returns a response immediately. The response looks something like this:
{
  "package_id": "01ENXTA4MFP1LWEXEDKQK7XKV",
  "upload_id": "ccea8dc3-3af3-4e0e-b8f0-8cf23d9968e7"
}
Let's take a closer look:
package_id: A unique ID for the package that MASV Agent created for your upload.upload_id: A unique ID for tracking and managing the uploading of your files. In the next step, you'll use this ID to follow the upload's progress.
Put the upload ID in a shell variable so you can use it later. Remember to replace the value with the one from your response.
UPLOAD_ID="..."
Step 6: Track progress
Your application can use the upload ID to poll MASV Agent about its progress. We recommend that your application does this no less than every 5 seconds.
Your application can also pause or cancel uploads with the upload ID.
For this tutorial, you'll check the upload's progress.
curl --request GET http://localhost:8080/api/v1/uploads/$UPLOAD_ID | jq
Here's the response, shortened for this tutorial:
{
  "items": [ ... ],
  "name": "My first package",
  "progress": 417216,
  "size": 417216,
  "state": "idle",
  "package_name": "My first package",
  "package_id": "01ENXTA4MFP1LWEXEDKQK7XKV",
  "upload_id": "ccea8dc3-3af3-4e0e-b8f0-8cf23d9968e7"
  ...
}
Some of the properties in the response:
items: An array of the files in the package, with each element containing details about a file, its state, and its progress.progressandsize: The number of bytes that have been uploaded so far and the size of the package itself. Your application can use this information to report progress to your users.state: The status of the package's upload.
To learn more about upload states for packages and the files in them, see Uploads.
Step 7: Finalize the upload
This tutorial uses a small file, less can 1 MB. MASV Agent uploaded it in a few seconds. If the state property still shows transferring in Step 6, repeat it until the state property is idle.
After MASV Agent finishes uploading your package and the package's upload state is idle, your application can finalize the package. Finalizing a package lets MASV know that your package is ready to use. MASV can then notify recipients about the package, save it to cloud integrations, and do whatever else that you've set up in MASV.
curl --silent --request POST http://localhost:8080/api/v1/uploads/$UPLOAD_ID/finalize | jq
Here's the response:
{
  "code": 200
}
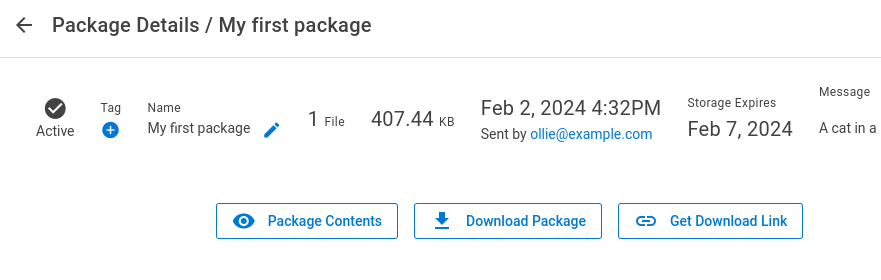
Your new package is ready!
Congratulations! Your application has authenticated, created a package, uploaded a file, and finalized the upload.
Go to the MASV Web App to see your package, ready to download:
Next steps
- MASV Agent: Full details about adding MASV transfers and automations to your application.
- MASV Web Uploader: A user-friendly GUI uploader you can add to your web application.
- MASV API: The RESTful API for interacting directly with the MASV cloud.